How to set a password to access a folder. How to put a password on a folder on a Windows computer without and with programs. We protect the folder with a password using a file with the extension bat
Quite often, everyone in the household uses a computer and there is a need to hide certain information in a folder from prying eyes. There is a stereotype that it is difficult to do this. But with a little effort, in just a couple of minutes you can put a password on a folder or file.
To this day, the Windows operating system does not have the ability to hide information in folders and files. Microsoft provides the ability to restrict access to certain users. But the computer can be used by several people and this option is not entirely convenient.
You can find and install the program on the Internet. You just have to spend a lot of time studying the nuances of its work. In this case, the WinRar archiver will come in handy. As a rule, it is installed on almost every computer. It’s hard to work without an archiver, and sooner or later you’ll have to download it.
To set a password using the WinRar archiver you need to:

1. Right-click on the folder or file to which you want to close access. Then select “Add to archive” in the context menu that appears.

2. A small window will open where you can set the parameters. Click on the “Set password” button. To do this, you need to set them in the “Advanced” tab by clicking on “Set password”.

3. After this, a window will open where you will need to enter the desired password and confirm it. You can also select additional options here: display the password as you enter (the characters you enter will be shown) and encrypt file names (file names will be in the form of asterisks, additional protection).

4. The password is set to archive. An asterisk next to a file means it is password protected. You can add any file or folder to the created archive by first entering a password.

5. When opening the archive, a window will appear asking you to enter a password.
Files archived with WinRar archiver open without problems.
Let's figure out how to put a password on a folder using the free Dirlock program. This is a fairly simple way to protect personal data. Download and install the program ().

After this, just right-click on the folder that we want to protect with a password and select “Lock/UnLock”.

In the next window, enter the password for the folder 2 times and press the “Lock” button. If you check the box next to “Hide”, the folder will become hidden. You can find it in the folder with the installed program C:\Program Files\dirLock\. To open a folder, you need to click on the folder and select “Lock/UnLock” again, and then enter the password.
I would like to note that the program does not work correctly in, at least for me.

Developers release thousands of different programs every day. This is how Password Protect USB was born in the software sector. It is distributed free of charge and finding it will not be a problem.
After downloading the program, you need to install it. In order to put a password on a folder using Password Protect USB, you will need to perform a number of simple steps:

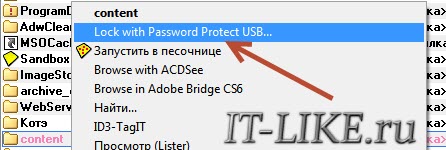
1. Launch the program and click Lock Folders. Next, a window will appear in which you need to specify let to the folder. These actions can be done in just a few clicks: right-click on the folder and select Lock with Password Protect USB from the context menu that appears.

2. A small window will open where you need to create a password and enter it for confirmation. Click Lock Folder.

3. A message will appear that the folder is password protected, and there will be a red icon on the folder itself. If one of the users tries to open it, he will see a window where he must enter a password.
By setting password protection on a folder, you can transfer various documents to it. Access to them will be closed.
Using Password Protect USB, it is possible to set a password for folders that are located both on the computer and on flash drives.

The Anvide Lock Folder program allows you to do similar actions. You need to launch it and click on the big plus sign. Then find the required folder in the list and click “Ok”. A folder will appear in the program window indicating its location. To set a password, you must first select it, and then click on the lock and enter the password. Anvide Lock Folder differs from similar software in that it provides a password reminder function. The folder can only be accessed through the program.
Windows has no built-in functionality for this task. But you can use free programs from third-party developers. Let's take the 7-Zip archiver and the Anvide Seal Folder utility as an example.
Using 7-Zip
7-Zip archives the folder, encrypts its contents and blocks access to it with a password. Surely you are already using this program. If not, then download 7-Zip from the official website. If you prefer another archiver, then most likely you can use it to put a password on the folder in the same way.
After installing the archiver, right-click on the desired folder and select 7-Zip → “Add to archive”.
In the window that appears, under the “Encryption” item, enter the password and repeat the combination. Check the box “Encrypt file names” and click OK.
After this, the program will create a copy of the folder in the form of an encrypted archive, the contents of which can be viewed only after entering the password. Delete the original folder that remains unprotected.
In exactly the same way, 7-Zip allows you to password protect any selected file.
Using Anvide Seal Folder
If you don't want to mess with the archive, you can set a password directly on the folder itself using the Anvide Seal Folder program. This utility encrypts the contents of selected folders and hides them from prying eyes. Containers protected in this way can only be opened through the Anvide Seal Folder interface after entering the password.

The program is very easy to use. By clicking on the plus, you can select the path to the desired folder or to several containers one by one. After this, a list of added folders will appear in the Anvide Seal Folder main menu. To put a password on one or more of them, just select them, click on the lock and follow the prompts of the utility. You can also set a password to log into Anvide Seal Folder.
On macOS you can do without third-party programs. The system allows you to create a so-called folder image, which is an encrypted copy of it. All files that are saved within this image are password protected.
To create such an image, open Disk Utility (Programs → Utilities → Disk Utility).
Click “File” → “New Image” → “Image from Folder” and specify the path to the folder you want to protect.
Enter a name for the image and indicate the location on your computer where you will store it, as well as the password to access its contents. For encryption, select 128 or 256 bits, and for Image Format, select read/write. Then save the changes.

Open the created image, enter the password and make sure that all files are in place.
Delete the original folder. Now you can use it in a protected way instead.
Recently I needed to password protect a folder on my computer and to do this I had to go through a bunch of programs. As a result, I chose a few worthy of attention and decided to tell you about them. Also, there are “classical” encryption methods, which will be discussed at the end of the article. I think many people will be interested in this topic, and for those who are too lazy to read, there are a couple of videos in the article.
Setting passwords using programs
This method will appeal to most of you. It makes it easy to hide folders from users' eyes. But this theme has a drawback - in order to remove the protection, you need to run the program every time. I found three programs worthy of attention.
Free program Anvide Lock Folder
After installation, a folder with shortcuts appears on the desktop.
- The folder to which you want to restrict access must be moved to the program window or click on the plus sign and select it manually
- Then click on the folder and press “lock”
- We come up with a password, enter it twice and voila - the folder completely disappears from Explorer!

You don't have to enter a password hint, but don't forget it! To enter a closed folder yourself, you need to:
- run the program
- click on an item in the list
- click on “open lock”
- enter password.
The interesting thing is that the “attacker” will not be able to find your data on the computer and, even if he knows the password, will not understand where to enter it 🙂 Even if he boots from another operating system, he will not find anything!
To get to the settings, click on the “wrench”, there are several convenient options there.

Set a password to launch and change program settings. Check the boxes “Close access to all folders after exiting the program” and “Forcibly close access to folders.” The latter will be needed if the files in your directory are occupied by another program and ALF will not be able to set a password.
To make this option available, click "Customize" and specify the location of the "unlocker.exe" file (usually in "C:\Program Files\Unlocker"). This is a program for the usual way. You will need to install it.
Remember, before reinstalling Windows, you must open access to all folders!
Paid feature – Password Protect USB
Do not pay attention to the “USB” prefix, the program works with different drives. The program has a 30-day trial period and a limit on the size of protected data - 50MB.
Right-click on the folder and select “Lock with Password Protect USB”
The presence of this item in the context menu distinguishes Password Protect USB from the free ALF. If the password setting window does not appear automatically, then click the “Lock folders” button in the program and manually find the folder on the disk. Then set a password and, if desired, a password hint.
The work of “Password Protect USB” is somewhat similar to an archiver, because... the folder is hidden in a file with the extension “.___ppp”, which, with a little effort, can be deleted. I think this is the only, but very significant, minus of the program. On the other hand, these files can be transferred to a USB flash drive and reinstall Windows without fear. Then install “Password Protect USB” again and select “Search for Locked Folders...” at the very bottom.
By clicking on the “.___ppp” file, “Password Protect USB” is launched and a password request to remove protection appears. You can also manually check the items and click the “Unlock folders” button:

After work, don't forget to set your passwords again!
In a nutshell, I’ll introduce you to another wonderful free program – Hide Folders. Works like “ALF”, i.e. The folder is completely hidden. We also transfer the directory to the window, or press the plus sign and select it on the computer ourselves.
Then press the “Hide” button, thereby turning on the operating mode, and check the folder box, and in the status column it will be written “Hidden” (hidden). To remove protection, uncheck the required items in the list, or click “Unhide” to turn off the program for all folders.

An important difference is that one common password is set for all folders, which is asked when the program starts.
Watch a video on working with the described software
How to set a password for archived files
If you need to hide a small amount of information, for example, several documents, then I recommend not to bother installing programming masterpieces, but to limit yourself to any of the well-known archivers. I mean, the easiest way is to archive the file with your favorite archiver with a password. In this case, when from the archive you will need to enter a password. Personally I use . To place files or a folder in a password-protected archive, you need to select them, right-click and select “Add to archive”:

Next, click “Set password…” and enter your one and only password twice (in older versions you need to go to the “Advanced” tab). The “Encrypt file names” option will not allow your household (or whoever you are encrypting from) to see what’s inside the archive, let alone get files from there :)

You can delete source files manually or check the box on the “General” tab - “Delete files after packaging.” With a complex password (from 8 characters with large/small letters, numbers and special characters), it is almost impossible to crack such an archive at home. But this method has disadvantages: it is inconvenient to work with large amounts of data, it is problematic to store and run programs from the archive, and the possibility of simply losing data if the archive is deleted;)
There is another slightly more convenient way using archiving. By default, Windows has ZIP folders. This is when a zip archive is displayed in Explorer not as a file, but as a folder. You can work with such a directory almost as if you were working with a regular one. Please note that in file managers such as Total Commander or FAR, the archive will still be displayed as a regular file.
The problem is that when installing WinRAR, Windows Explorer displays zip archives as regular files. Instead, you can use the program 7-Zip, it does not disable zip folders.
Built-in Windows tools to restrict access
In Windows 10/8/7, you can restrict access to files and folders even using built-in tools. If your disks are formatted in NTFS, then you can set access rights for individual files. But this will only make sense if each computer user has his own account in the system and it does NOT have “Administrator” rights.
That is, in the folder properties we will indicate those users who can use it. If a person does not have rights, he will not receive access or identification will be made. So, to do this, right-click on the folder or file in Explorer and select “Properties” - “Edit”

Here you need to click “Add” and enter the logins of users to whom you will deny access. Then click “Check names” to make sure there are no errors:

If you need to close it for everyone, then write the username “Everyone”, the system will understand. Then you need to check all the boxes in the “Deny” column and click “OK”

Now these users will not be able to access information when they log in to their account. But they will be able to open access if they log in with administrator rights, for example.
You can also remove all users from the access list and add only the ones you need. But most likely, an error will be thrown when trying to delete at least some element, because by default they are inherited from the parent directory. Therefore, you will need to go through the buttons “Advanced -> Change permissions...” and uncheck “Add permissions inherited from parent objects”

The system will ask you to “Add” or “Delete”. If you choose the first, then you yourself will be able to delete elements from the list, and if the second, then the inherited rights will be deleted. Now you can go back to setting permissions and adding only those people who will have access. Naturally, the checkboxes now need to be checked in the “Allow” column.
EFS encryption
Windows 7/8/10 also has the EFS encrypted file system, which allows you to encrypt data at the physical level. Only those who have the key file will be able to access them. It is added to the storage once and you work with your data as usual, but others do not, and no password will help them.
To encrypt a folder, you need to right-click on it, select "Properties -> Other" and check the box “Encrypt content to protect data”

To regain access to encrypted data under a different user or after reinstalling the system, you need to double-click on the key (file extension .pfx), enter the password and finish importing the key into the storage:

Do not lose keys and passwords in any of the described methods! Recovering something using email (as usual) will not work!
There are many ways to protect a folder on your computer with a password, but most of them require the installation of special software. However, many of these programs are paid. There is an easy way to put a password on a folder using a batch file. Although this method does not provide 100% protection, it can be used as an option to protect your data.
Setting a password for a folder
First, let's create a regular folder anywhere with an arbitrary name. For example, Personal.

Then you need to enter this folder and create a text document with any name in it. This is easy to do using the context menu.
 Open a text document and paste the following code:
cls
@ECHO OFF
title Folder Private
if EXIST "Compconfig Locker" goto UNLOCK
if NOT EXIST Private goto MDLOCKER
:CONFIRM
echo Are you sure you want to lock the folder(Y/N)
set/p "cho=>"
if %cho%==Y goto LOCK
if %cho%==y goto LOCK
if %cho%==n goto END
if %cho%==N goto END
echo Invalid choice.
goto CONFIRM
:LOCK
ren Private "Compconfig Locker"
attrib +h +s "Compconfig Locker"
echo Folder locked
goto End
:UNLOCK
echo Enter password to unlock folder
set/p "pass=>"
if NOT %pass%== PASSWORD_GOES_HERE goto FAIL
attrib -h -s "Compconfig Locker"
ren "Compconfig Locker" Private
echo Folder Unlocked successfully
goto End
:FAIL
echo Invalid password
goto end
:MDLOCKER
md Private
echo Private created successfully
goto End
:End
Now we find the field in the code PASSWORD_ GOES_ HERE and replace it with the password we need. Save the file and rename it to locker.bat.
! If you have file extensions disabled on your system, you may have difficulty changing the file name. The point is that in the file locker.bat, locker is the name of the file, and .bat- extension. When displaying file extensions is disabled, you see only the file name and when you rename a text file, you assign a name to it locker.bat, but the extension remains the same - txt. Therefore, to avoid such problems, before renaming the file you need .

Checking the code
We run the file locker.bat, as a result of which a Private folder should be created, in which you need to place all your documents that you want to protect. After that, run the batch file locker.bat again.

You will now be prompted to lock the folder. Select Y.

This will make your Private folder disappear.

If you run the locker.bat file again, you will be prompted to enter a password.

When you enter the password you specified in the batch file, the Private folder will be displayed and you can work with it again.
Conclusion
This method of setting a folder password is not the most secure. The fact is that an experienced user can see your documents if he turns on the display of hidden and system files in the system. You can also find out your password by viewing the contents of the locker.bat file. The advantage of this method is that no additional software is used. Therefore, it can be used as an option to protect your documents from inexperienced users or children.
Hello site! Tell, how to set a password for a folder so that no one but me opens it? I read an article on your website where you show how to set a password on a flash drive using . folder?
Why am I asking? At my work, data located right on the desktop of my computer’s operating system was stolen. Everything is trivial, I walked away for five minutes, at that time someone inserted a flash drive into my computer and copied a document containing registration data for several sites and a password for an email account, I only realized this the next day, when my personal photos began to circulate on social networks, then they called me from five online stores and asked me to confirm some orders (pants, T-shirts) that I allegedly made, and my friends called one after another and said that they had received strange letters from me in the mail asking for replenishment some phone number...
The next day, following instructions from the Internet, I archived my most important folder on my computer with WinRAR, set a password on the archive, then tried to unzip the folder and work with the files, but a warning came out that the file could not be changed or you do not have the necessary access rights.
I had to remove the “Read Only” attribute from all the files in the archive and only then work with them. Then it turned out really funny, I was surprised to discover that in an archive protected by the WinRAR program you can delete files without entering a password,

And the archive itself with the password can simply be deleted and the recycle bin emptied, and I’ll simply be left without my files.
But most importantly, if the folder that I want to archive is very large in volume, then all my operations with it will take a very long time. Most likely this method does not suit me.
I found out on the Internet that for To set a password for a folder, you can use the AnvideLockFolder program, you can get it on this site http://anvidelabs.org/alf.html, but why, when trying to download a program, the all-knowing Google displays such a window,

And my antivirus is like this:

So, if I download the program, then another problem awaits me?
How to make everything easier admin? I noticed that if you are already writing an article, then you try to convey to the person as much understandable and easily digestible information as possible. I will be very grateful for your answer.
How to set a password for a folder
Hello friends! If you store confidential data on your computer in any folder, then you can put this folder on it, or put a password on it, and I’ll even say more, you can also hide the folder, so much so that even turning on the system for displaying hidden files and folders is hidden protected system files will not help, and the folder will be on the desktop at this time. But unfortunately, such a trick cannot be done using installed Windows, even if it is the latest Windows 8, but there are good free and very good paid programs, I’ll tell you about them now.
More set a password for a folder You can use the WinRAR archiver program, although it’s not very convenient, but it’s up to you to decide. Now I will show you how to use all the programs and you will choose what you need.
1) - not a very good method, the folder can be copied to a flash drive and if you have an unimportant password assigned, they will guess it or simply hack it. Files in the archive can be deleted without entering a password, and the archive itself can be simply deleted without knowing the password.
2)How to set a password for a folder using the paid program Hide Folders 2012- I use it personally, it’s serious protection.
3)How to set a password for a folder using the free program AnvideLockFolder- used it a little.
How to set a password for a folder using WinRAR archiver
On my computer, in the root of the C: drive, there is a folder called “Personal” and I want to set a password for this folder. I right-click on the folder and select Add to archive.

Let's go to the tab Are common and select the item Set password.

In older versions of the program, you can set a password on the tab Additionally.

We assign a password,

If you don’t know how to come up with a good password, read our article -.
That's it, our folder is in the archive and to extract it from the archive you will need to enter a password.
For example, in our absence, someone saw an archive called “Personal” on our desktop and tried to extract files from the archive,

A window like this will open asking you to enter a password.

If you are trying to open the archive, then you simply enter the password, then click OK and the files are extracted.
If you need to work with any file and want to change it, then you will get an error,

Then remove the Read Only attribute from it. Right-click on the unzipped file and select Properties.

Then uncheck "Read Only", then Apply and OK.

To work with any file in the archive, you do not have to extract the entire archive, double-click on the archive with the left mouse and find our file, then simply drag it to the desktop, enter the password and the file is copied. We remove the Read Only attribute, work with it and drag it back to the archive, that’s all.
How to set a password for a folder with the paid program Hide Folders 2012 - I use it personally, serious protection
A very convenient and most importantly simple program in Russian, now see for yourself.
The program is paid, but it works for 30 days, showing itself fully without restrictions, within 30 days you get used to it and can no longer live without it. You can download it on the official website http://fspro.net/hide-folders/
Click DOWNLOAD NOW. Download and install the program.

The main window of the program. To start working with any folder, click on Add.

click on the button

and in the explorer that opens, we find the desired folder for which we want to put a password, in our case a folder called “Personal”, select it and click OK.

In the main program window that appears, double-click on our folder with the left mouse or click on “Properties”

And the Protection Method window will open, containing almost all the functionality of the program, let's look at it in detail:

1) Don't defend- the folder will not be protected and anyone who gets on your computer can enter it and do whatever they want with the files in it.
2)Hide- the folder will be hidden by the program so much so that even turning on the display of hidden files and folders and hidden protected system files in the system will not help.
3)Block- the folder will not be hidden, but you will not be able to enter it until you open the program and check the Do not protect option.
4)Hide and block- the folder will be hidden and you will not be able to enter it until you open the program and check the Do not protect option.
5)Only reading- the folder will not be hidden; you can enter the folder, but you will not be able to change the files in it.
Let's look at all the functions of the program in detail and, most importantly, find out how to put a password on a folder using this program.
1) Don't defend. Everything is clear with the first point, so to speak, “Come in, take what you want”

2)Hide - the folder will disappear

And to find it you will need to launch the program and click on the Turn off button, our folder will immediately appear and you can work with it

3) Lock - the folder will be visible on the desktop, but when you try to enter the folder, a “No access” window will appear,


To enter the folder, click on the Shutdown button
4)Hide and block- the folder will be hidden and locked,

To cancel, click Turn off, the folder appears
5) Read only - the folder will not be hidden, but you will not be able to change the files in it, an error will appear

Again, until you click the Turn off button
Set a password for the folder
First of all, we choose a means of protection, I personally choose Hide,
Now I press the button Password 
If you have previously entered a password, the following window will appear. Enter the old password, then the new one, and the new one again, then click OK.

Now, to open our hidden folder, you need to open the Hide Folders 2012 program, when you open it, a password entry window will appear, enter the password


