Setting up a remote connection to 1s. Connection in “Remote Desktop” mode. Connecting in Remote Desktop mode
1C:Link is a simple way to organize a remote connection via the Internet to 1C applications installed on the user’s computer or server.
The service does not require special knowledge or the presence of a system administrator. You can set up access via 1C:Link yourself in a few minutes. You don't have to make any changes to your computer settings or buy additional equipment.
Main scenarios for using the service:
- The 1C program is installed on an office computer, but you need to work from home or another place.
- Your company has a remote warehouse or office whose employees need to connect to the 1C database.
- The company's specialists work in different offices, but everyone needs access to the 1C program.
- An executive or manager is often not in the office and they need reports on revenue, remaining goods in the warehouse, prices from the 1C accounting system...
When creating 1C:Link, we paid special attention to security issues. Information bases are located only on your computers. All data is transmitted over a secure channel, and additional authorization is provided for access to your 1C databases.
As in a local network, several people can work with several databases at the same time. The service works with non-standard configurations; all settings and modifications to 1C programs are saved.
Terms of Use
The service works in programs:
- 1C:Accounting 8 (edition 3)
- 1C: Managing our company 8
- 1C: Trade Management 8 (revision 11)
- 1C: Document flow 8
- 1C:CRM 2.0
- other 1C programs developed in “managed application” mode.
Internet access is required for the service to work.
The service is not supported in basic versions of 1C:Enterprise solutions.
Price
Agent "1C:Link 2"
RUB 7,560/year
- Connect up to two bases;
1C:Link. Expansion by 1 base
RUB 5,250/year
- Connecting one additional database (with a valid "1C:Link 2 Agent" license)
1C:Link. Expansion by 5 bases
RUB 15,750/year
- Connection of up to 5 additional databases (with a valid license "Agent 1C:Link 2")
1C:Link test for 1 month
Get- Connect up to two bases;
- Any number of users (according to the number of purchased 1C:Enterprise client licenses)
| Quantity months |
Price, rub) | ||
|---|---|---|---|
| Agent "1C:Link 2" | 1C:Link. Expansion by 1 base |
1C:Link. Expansion by 5 bases |
|
| 1 | 760 | 530 | 1 580 |
| 2 | 1 490 | 1 040 | 3 100 |
| 3 | 2 200 | 1 530 | 4 580 |
| 4 | 2 890 | 2 010 | 6 010 |
| 5 | 3 550 | 2 470 | 7 390 |
| 6 | 4 190 | 2 910 | 8 730 |
| 7 | 4 810 | 3 340 | 10 020 |
| 8 | 5 410 | 3 760 | 11 260 |
| 9 | 5 980 | 4 150 | 12 450 |
| 10 | 6 530 | 4 540 | 13 600 |
| 11 | 7 060 | 4 900 | 14 700 |
| 12 | 7 560 | 5 250 | 15 750 |
Special offers
"Agent 1C:Link 2" is included in information technology support packages
It is often necessary to work with 1C databases from home or provide access to the databases to some remote branch via the Internet. Using Hamachi, we can connect any computers over the Internet into a regular local network, use shared folders, printers and other devices.
Hamachi is free, there is a limit of no more than 5 users on the same network. But it’s easy to get around, because... The number of created networks is not limited. For example, if you need to connect 8 remote users to the server via the Internet, we create 2 networks in Hamachi, add our server to each of them and 4 users to each network.
Hamachi setup instructions
Go to the website https://secure.logmein.com/RU/ and register your account. After you click “Register”, a window will appear:
Select "Remote access to computers".
Next, enter your registration information and click “Continue.” 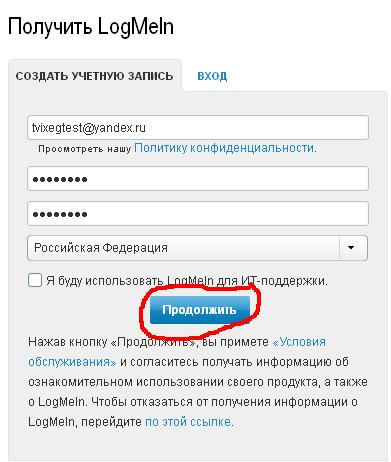
In the next window, he will offer to download LogMeIn, we don’t need it, let’s move on to setting up our account. 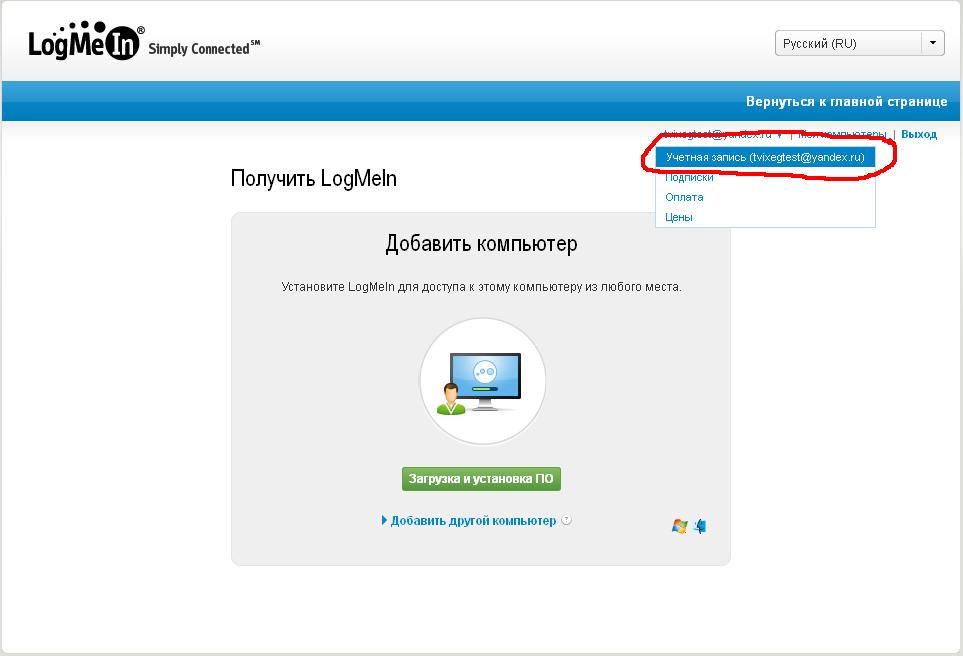
Next, go to “My Networks” and click “Create Networks”. 
Set the network name, description and select the network type. I chose a mesh network, where every computer on that network will have access to every other computer on that network. 
Next, click "Continue". In step 2, we will make requests to connect to our network require confirmation. In this case, a password is not particularly needed to connect to our network. 
Next, in step 3, click “Proceed to add a client.” 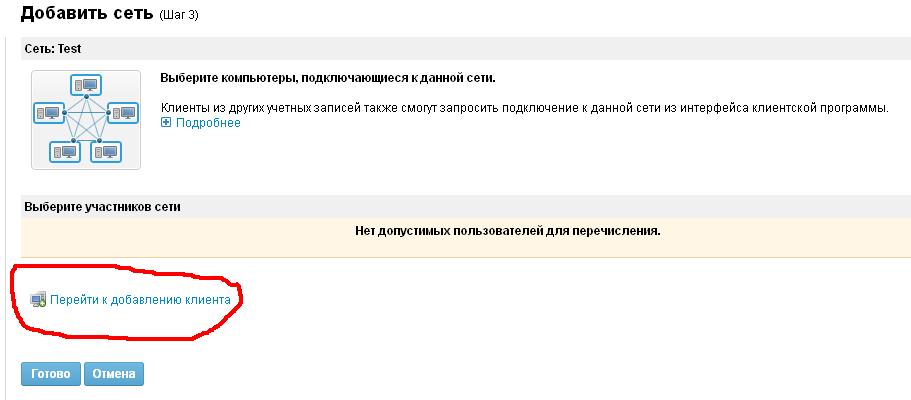
Next, select “Install LogMeIn Hamachi on this computer.” 
Next, download the program distribution kit. 
Let's launch it and install it. We go into the program, go to the “Network\Connect to an existing network” tab. 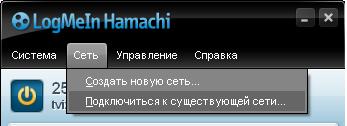
In our account, we look at the identifier of the network we created and enter it in the window that opens. 

We agree to the request for membership. Then, in our account for the network we created, go to the “Connection Requests” tab and check the “Accept” checkbox. Click "Save". 
Thus, we have added one participant to our network. Next, you need to install Hamachi on other computers, send them a request to connect to our network, and accept these requests in your account.

After this, all these computers will be networked. We will be able to use shared folders, printers and other devices as if these computers were on the local network.
Connecting in Remote Desktop mode
System requirements
To work in Remote Desktop mode, you must have one of the Microsoft operating systems installed on your computer: Windows XP, Windows Vista, Windows7, Windows 2003/2008 Server, Windows Server 2008 R2.
The version of the program to launch the remote desktop (mstsc.exe) must be at least 6.1. If you meet the operating system requirements, but Remote Desktop is not working, you may need to install updates through Windows Update (available in Control Panel).
Please note that working in remote desktop mode with other operating systems (Android, Apple iOS, etc.) is not guaranteed, due to the fact that a different protocol is used for data transfer (RDP 6.1 and higher, as well as its extensions RD-Gateway and TS-Gateway).
If you want to work with 1C on mobile devices with operating systems other than Windows, the Correct Solutions company will help you adapt the programs you need.
Connection and configuration using a shortcut
To quickly connect to Remote Desktop, you need to request a shortcut to launch the program from your personal developer. If the shortcut is already installed on your desktop, simply click on the icon and enter your credentials (username and password) in the window that appears. The shortcut can be copied to any computer and run the program (the computer must meet the system requirements).
To be able to use local disks, they must be connected to the Remote Desktop. To do this you need:
1. In the “Remote Desktop Connection” window, go to the “Local Resources” tab
2. Click the “Details” button
3. Mark those disks that you will need when working with the remote desktop.
4. Click “OK”.
To connect a printer, you need to check the box next to the “printers” icon. Please note: to connect a local printer, you must install MS.Net Framework 3.5 SP1 on your local computer. You can download the program on the Microsoft website.
Self-configuring a shortcut to launch Remote Desktop 1C
To configure the Remote Desktop shortcut yourself, you must:
1. Run the Remote Desktop program (Remote Desktop or Remote App), file name - mstsc.exe
2. Enter your account parameters.
3. The 1C program will open in the window that appears. If 1C does not open automatically, in the Remote Desktop window you need to launch a program to access the information base (for example, 1C: Accounting PROF).
4. Set up a connection to the 1C infobase (same as setting up with)
You can work with 1C: Accounting while at home, on vacation or on a business trip. Moreover, for this it is not necessary to buy expensive equipment, store the database in the “clouds” or carry it with you on a flash drive. You can organize access to your 1C:Enterprise 8 programs using the new 1C:Link service.
The ability to connect to an accounting or trading program at any time and from anywhere is an advantage that needs no comment. Having this opportunity, an accountant will be able to work while at home or in the country, a “mobile” employee will have the opportunity to process customer orders and write out documents directly “in the fields,” and a manager, going on vacation or a business trip, will supervise work in the office.
To organize such remote access, you can transfer your databases to a virtual server, that is, use cloud technologies. But this method is not suitable for everyone. Firstly, traditional cloud services do not always support individual settings and modifications of programs; you have to abandon the usual ways of working and adapt to the strict requirements of the Internet solution.
Secondly, users may worry about the safety of their information databases. And although most often these doubts have no real basis, for some enterprises they become a stumbling block. Not every company will agree to transfer business-relevant information to the cloud. Focusing on the needs of such enterprises, 1C has developed an alternative solution to cloud technologies - the 1C:Link service.
How 1C-Link differs from cloud solutions
The 1C:Link service allows you to work via the Internet with applications installed in the office or at home. There is no need to transfer your databases to the “clouds”; all information is stored on users’ computers, and all improvements and settings of 1C:Enterprise 8 are saved. To quickly connect to the database, you only need a computer with network access.
The security issue has been resolved as follows: the computer on which 1C applications are installed is invisible over the regular Internet; User data is not saved on external servers. The transmitted data is protected by individual keys and certificates, which are stored only by users. The service provides a secure communication channel - a network tunnel through which the user gains access to his information. In addition, additional protection can be arranged. To do this, you can independently set access for different categories of employees. It is also possible to disable access for one or all users at once at any time. You can work through “1C:Link” with the programs “1C: Accounting 8, edition 3”, “1C: Trade Management 8, edition 11”, “1C: Document Flow 8”, “1C: Small Firm Management 8”, as well as solutions created on their basis or independently in the “managed application” mode. Access can be configured simultaneously for several users, to several software products or information databases at the same time. You can do this yourself, or you can contact a partner of the 1C company.
How to independently connect the 1C:Link service
Connecting the 1C:Link service is very simple - just register on the website www.link.1c.ru, download a special application and select the databases with which you want to work remotely. The entire sequence of actions consists of five steps.
Step 1. Register on the website link.1c.ru and confirm your registration by clicking on the link that you will receive to your email address.

Rice. 1. Registration on the site
Step 2. On the computer where your 1C:Enterprise 8 is installed, download the installation file “1C:Link Publishing Wizard”, and then open it from the 1C program.

Rice. 2. Installation of “1C:Link Publishing Wizard”
Step 3. Accept the terms of the user agreement and click the button Further. The wizard will offer to download the components necessary for the operation of 1C:Link Agent. Agree to the download by checking the appropriate box.
After this, select a location to install “1C:Link Agent” or agree with the proposal. Click the button Further.
Step 4. In the new window, enter the username and password that you specified when registering in the program.

Rice. 3. Connecting the site to the 1C:Link service
Then select the name of the site through which you will connect to your applications via the Internet (the site name is entered in the format “xxxxx.link.1c.ru”). Click Forward.
Step 5. In the window that opens, specify the name of the infobase to which you need Internet access.

Rice. 4. Selecting an information base
Step 6. The wizard will inform you that it is ready to download the components necessary for 1C:Link Agent to work. Allow the download by clicking the button Install.
You will soon receive a notification that the installation is complete. A notification will appear on your computer screen.
Pressing the button Forward, you will see a list of databases that are available for remote work.

Rice. 5. Available work bases
At the same time, the “1C:Link Agent” icon will appear in the system menu of your computer, through which secure access to your databases will be provided via the Internet.

Rice. 6. “1C:Link Agent” icon in the system menu
note: the list of databases available for remote work, you can change at any time if necessary.
How to connect to a working database from a remote computer
To work with your databases via the Internet, open your website (xxxx.link.1c.ru) in the browser of a remote computer and enter the login and password specified during registration. In your personal account you will see all the databases that are available for remote work.

Rice. 7. Connecting to infobases from a remote computer
Click on the desired database and work in the familiar interface.
Connecting the 1C:Link service takes a few minutes. Doing this is no more difficult than installing, for example, Skype or registering on a social network.
Your work programs will be available to you from any computer with Internet access, as usual, with all modifications and settings saved.
The service will provide a high level of connection security, and you will not worry about the safety of your data.
Working through 1C:Link does not require additional costs. The service is already included in the package of information technology support services (1C:ITS).
If you have a valid 1C:ITS TECHNO level contract, you can connect Internet access to two information bases for free, and if 1C:ITS PROF level - to five.


