Rules for uploading data 1s 8.3
Very often you need to obtain data from 1C 8.3 and save the information to an external file, in other words, download it from 1C enterprise. The task is almost always possible without the involvement of 1C programmers.
Let's look at a number of useful tips with which you can upload data from 1C to an external information system.
In 1C there are several methods by which you can obtain information without the involvement of specialists:
- Uploading the entire database from 1C 8.3 - for subsequent loading on another computer
- Save reports and printables in Excel, Word or PDF
- Uploading tables from 1C
- Retrieving Information Using the Query Console
More details about them:
How to download the entire database from 1C 8.3 (to a .dt file)
To do this, you will need to go to the configurator mode, then in the main menu select “Administration” - “Upload information base”:
Then you only need to indicate the name of the future file and its location on the disk.
To subsequently upload to another database, click on the “Load information base” button and select the previously uploaded file.
Uploading reports and printed forms from 1C to Excel
This method is universal and very simple. To do this, it is enough to open a printed form or report.
For example, open the TORG 12 printable form, press ctrl+S (or in the File – Save As menu) and select the file type and its name:

The same system applies - the report is downloaded in two clicks:

Get 267 video lessons on 1C for free:
Saving in the main formats is available - excel, word, pdf, html, txt, etc.
Uploading tables from 1C 8.3
Often there are such trivial tasks as “get a list of payments for the current year”, “unload a book of purchases or sales” or “unload goods from invoice No. 256”. Solving such problems is quite simple.
For example, I need to receive all receipts from the counterparty “Vector” with an amount greater than 1000. Let’s open the list form and set the necessary selections in the list:


The system will offer an output option - to a spreadsheet document or a text document, select tabular. The 1C program will display the information in the following spreadsheet document, which, like reports, can be saved in the format we need:

Similar actions can be performed for almost any tabular part in 1C 8.2. For example, we needed to unload a list of goods from receipt No. MSK00003, no problem. This is done very simply - open the document, call the context menu and after a couple of clicks we get the desired upload in the required format:

Uploading a journal of transactions from 1C to Excel:
Retrieving Information Using the Query Console
However, not all information can be found in the simple tabular part of 1C 8.2. Sometimes you need to collect data from several data sources and connect them using some fields.
This method is suitable for technically savvy people who know the basics of query language. It consists in obtaining the result of the request using and saving it in the format we need.
For example, you need to get all supplier counterparties and their phone number. To do this, we will write the following query:

The resulting table can also be downloaded into the desired file format:

You can load the received data into another 1C database using “ “. Watch the video instructions using the nomenclature as an example:
Operating modes
Processing UploadLoadDataXML82 implements 2 operating modes: Upload (creating an upload file of user-specified data) and Load (reading an upload file created by the mode of the same name and writing the data contained in it). The mode is set by selecting it in the Mode field.
Before starting a particular mode (clicking the Run button), you need to specify the name of the upload file, either by entering it manually in the “File name” field, or using the button to select this field and the standard file selection dialog.
In download mode, it is possible to edit the use of totals when writing registers, which may affect the download speed. The “Disable totals” and “Enable totals” buttons are available when the “Enable the ability to edit the use of totals while loading data” flag is set and are used to manually control the mode of using totals when loading data. ** Conditions of applicability of processing**
Processing can only be used in cases where the information base in which the data was uploaded and the one in which the data was loaded are homogeneous (the configurations are identical, the data may differ), or all the uploaded objects are almost completely identical in composition and types of details and tabular parts, properties of the “leading” metadata object, etc. It should be noted that, due to these limitations, processing is mainly intended for exchange between homogeneous IS.
The upload file format differs from the file format created when uploading according to an exchange plan in the header part. To upload data (directory elements, sets of register records, etc.), processing uses the same XML serialization mechanism as uploading according to exchange plans; in this part, the file formats are identical.
Determining the composition of the unloading
Processing allows for both full and partial uploading of infobase data to a file. The composition of the uploaded data is configured in the dialog by checking the boxes in the column of the tree that displays metadata objects for which data can be uploaded. An additional column of checkboxes, “If necessary,” sets the need to unload objects of this type “by reference.” That is, if the checkbox is checked only in the “If necessary” column, then the data for such an object will not be downloaded completely, but only to the extent that is necessary to maintain referential integrity in the infobase that will load the download file.
When opening a form, processing sets the sign of unloading by reference to all objects, which guarantees the referential integrity of the unloaded fragment of the information base.
When you click on the “Detect objects downloaded by link” button, processing analyzes which data links may be contained in objects that have the full download flag set, and automatically fills in the column of flags indicating the need to download by link. If the object already has the full unload flag set, then the unload by reference flag is not set.
Possible applications
The use of this processing is possible, for example, to create a full or partial backup copy of data, exchange data between information bases, and also as an auxiliary tool when restoring problematic information bases.
Backing up a 1C Enterprise 8.3 database allows you to protect the user from data loss when performing “dangerous” operations that can significantly change credentials (for example, correcting accounting registers, group changes to documents) or spoil the database (operations to update configurations, etc.). It may also be necessary to copy the database in order to transfer it to someone, and in this case the most compact size is required.
Uploading the 1C Enterprise 8.3 database to a backup copy
Backing up a 1C database can be done in several ways, the most universal is through the infobase upload utility in the 1C configurator. This method is suitable for both file and client-server applications of 1C Enterprise. To create a backup copy, you need to go to the configurator and select Administration - Upload infobase...
 Menu “Configurator - Upload infobase...”
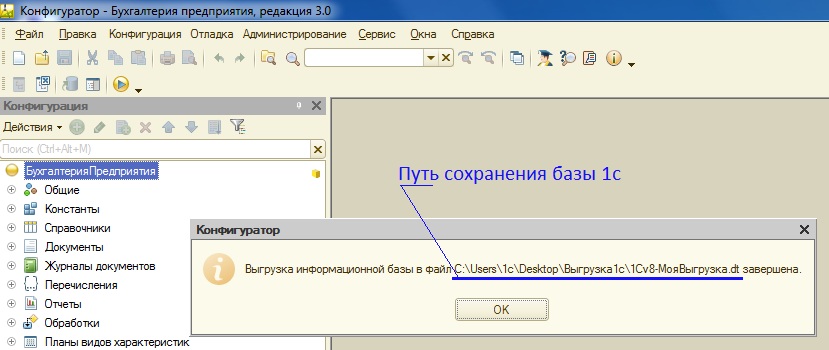
 A standard file saving panel will appear, where we indicate the directory in which we will save the backup copy. Enter the name of the upload file (the default is “1CV8”) and click the “Save” button. As an example, I'll change the default name to "1CV8-MyUpload". After this, wait until the backup procedure is completed.

After the upload is completed, a message will appear indicating that the upload of the infobase to the file has been completed, indicating the path and name of the upload.
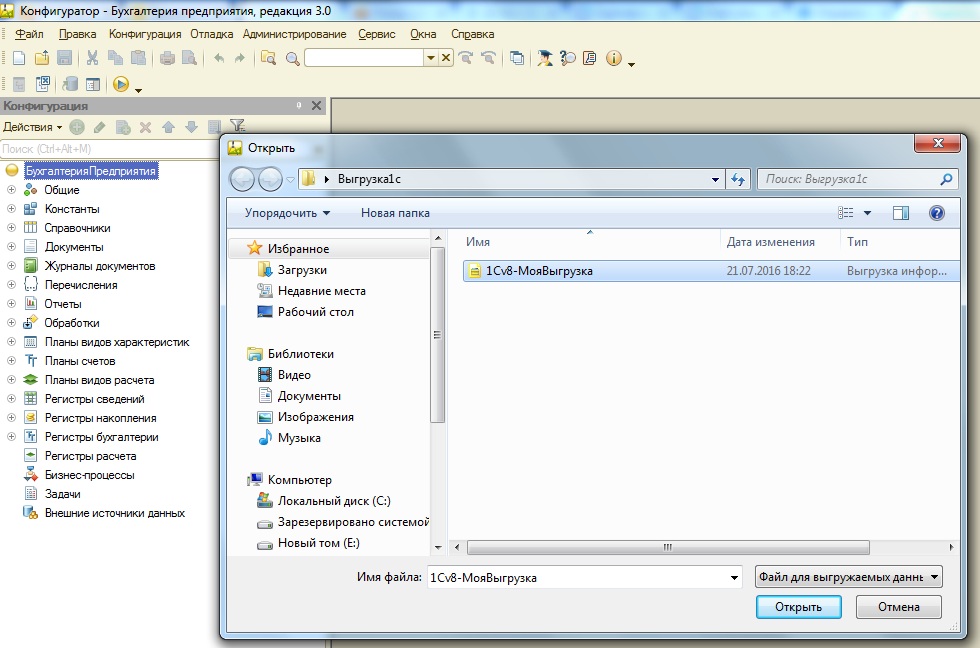
Now you can find the upload file in the directory you specified. Let's go to the specified directory and see the file in it 1CV8-MyUpload.dt. I'll add one useful note
The 1c backup upload file has the extension .dt
Now you can copy this file to media, send it, save it... the only thing is! — most likely, it will not be possible to send the download file by mail due to its volume.
Your upload file is ready, suppose you copied the file to a flash drive, brought it to a friend to show the status of your accounting, and then there is a need to restore the 1c database from your upload file.
Restoring a 1C Enterprise 8.3 database from a backup copy
To restore a database from a backup, the action plan is as follows:
- Create a new database 1C Enterprise 8.3
- Upload the 1C Enterprise 8.3 file into an empty database
Let's get started!
The process of creating a new 1C Enterprise 8.3 information database is described in detail in the article. After creating a new database, you need to load the upload file 1CV8-MyUpload.dt into it.
To load the 1C Enterprise 8.3 database from a backup copy, enter the created new configuration in the “Configurator” mode and select the menu item “Administration” - “Load information base...”

In the form that opens, select the 1c infobase upload file (has the extension *.dt)
and agree to the proposal to lose all data if the operation continues. The database loading operation will begin, the time depending on the volume of the loaded database.

As a result, we will receive a message that the information base has been successfully loaded. Next, we can agree to restart the configurator in order to see the loaded configuration objects, or we can choose not to do this, click “No” and close the configurator.

By entering the created database after downloading the 1c upload file in the “Enterprise” mode, you will see an identical copy of the previously uploaded 1c database.
Direct copying of the 1C Enterprise 8.3 database
After publishing this post, one of the clients received a request that he could not download the *.dt file to restore the backup. Having tried all the standard methods and interrupted all the popular queries on the Internet on this topic, we came across Recommendations for backing up 1C databases, which states that in the event of a failure in the 1C Enterprise 8.3 database, some information may not be uploaded to the *.dt file, while direct copying will save all the information. Therefore, in order to fully disclose the information, I decided to add this subsection.
Unlike uploading to a file using the 1C Enterprise 8.3 platform, direct copying involves direct copying of database files.
To copy a 1C Enterprise 8.3 file database, you need to go to the folder with the created database. The path to the database can be seen when you place the pointer to the desired infobase in the list of connected 1C Enterprise 8.3 databases. It will be located under the database selection window and will look like File = "Path to the 1C Enterprise database."

We follow the specified path and see the working files of 1C Enterprise 8.3.

The main data file is called 1Cv8.cd (type - File infobase), this is what you need to copy. The remaining files are auxiliary; they will be created anew when you launch the 1C Enterprise 8.3 configuration.
Accordingly, to launch the database you do not need to restore anything - copy the 1Cv8.cd file to the folder and .
Backing up a 1C Enterprise 8.3 database to a client-server version is more complex and requires special scripts or applications for working with relational databases on which the 1C Enterprise 8.3 database is deployed. This is a separate topic for discussion, so we'll talk about it next time.
If you have any questions, you can ask them in the comments to the article or on the website.
Don’t lose this useful article - save it on social networks using the buttons below:
Backing up the 1C Enterprise 8.3 database and restoring it
2018-11-15T19:32:35+00:00Universal processing "Uploading and loading XML data" performs full or partial unloading of infobase data into a file in XML format. Subsequently, this file can be loaded into the infobase using the same processing. The upload file format differs from the file format created when uploading according to an exchange plan in the header part.
Processing can only be used in cases where the information base in which the data was uploaded and the one in which the data was loaded are homogeneous (the configurations are identical, the data may differ), or all the uploaded objects are almost completely identical in composition and types of details and table parts, properties of the “leading” metadata object, and so on.
The use of this processing is possible, for example, to create a full or partial backup copy of data, exchange data between infobases, and also as an auxiliary tool when restoring faulty infobases.
Processing supports data uploading with the ability to specify selection by period. Also implemented is checking objects for the presence of invalid characters when exchanged via XML.
Sincerely, (teacher and developer).
Probably every 1C specialist has encountered the need to transfer data from one information base to another. In the case where the configurations are different, you have to write data conversion rules. These rules are created in the 1C “Data Conversion” configuration.
Data can also be transferred using . Many 1C 8.3 configurations have standard functionality for setting up data synchronization between different configurations and seamless integration with 1C Document Flow.
But when data needs to be transferred between absolutely identical configurations, you can simplify your task and use standard processing for uploading and downloading via XML. Please note that this method, like data conversion, compares objects with each other by a unique identifier (GUID), and not by name.
You can download this processing on the ITS disk, or using the links:
It is universal and suitable for any configuration.
Let's consider an example of unloading the "Nomenclature" directory from one 1C 8.3 Accounting 3.0 information base to another. A prerequisite will be selection by the parent (group) “Woodworking”.
Uploading data from 1C to XML
Go to the information base from which the data will be downloaded (source). Be sure to check them, taking into account all possible conditions to avoid undesirable consequences.
Open XML data upload and download processing (Ctrl+O).
We are interested in the “Upload” tab. First of all, specify the name of the file into which the data will be uploaded and the path for saving. In this case, the data is uploaded “to a file on the server”.
In the processing header you can configure the period for which the selection will be carried out. Also, for periodic registers, you can specify the method of applying selection by period. If it is necessary to upload movements along with documents, the corresponding flag is set. In this case, we overload the directory, so there is no need to configure anything in the header.
Let's move on to selecting data for uploading. In the tabular part of the processing form, select the checkboxes for the configuration objects that you need to transfer.
The “Unload if necessary” column means whether it is necessary to overload this object if it is referenced by the attribute of the directory we are overloading. For example, the position of the item you are loading has a unit of measurement that is not in the target database. If the flag in the “Upload if necessary” column is checked opposite the reference book with units of measurement, a new position will be created. Otherwise, the value of the attribute will be “<Объект не найден>" and its unique identifier.
In a simple case without selections, the item overload setting will look like this.

In this example, you need to select only the items that are located in the “Woodworking” folder.
Similar processing for 8.2 allows you to set selections for each configuration object in a convenient form. In 8.3, unfortunately, there is no such functionality. One way out in this situation would be to select the necessary items on the “Additional objects for unloading” tab.
You can add objects here either manually (the “Add” button) or by request (“Add by request...”). If there are a large number of them, the second option is preferable.

In this case, the request will be as follows. Fill in the parameters, complete the request after checking the data, and click on the “Select result” button.

After you have specified all the necessary objects and additional elements for uploading, click on the “Upload data” button. They will end up in an XML file, the name and path of which you specified earlier. The results of this operation will be displayed in messages.

In this example, it was necessary to unload only 3 positions, but five were unloaded. This is because a flag was set opposite the “Nomenclature” directory in the “Upload if necessary” column. Along with the necessary positions, their parents were overloaded.
Loading a directory from XML
After successfully downloading data from the source configuration into an XML file, open the destination database. The structure of objects and their details must match each other. In this case, the transfer is carried out between two standard configurations 1C: Accounting 3.0.
Open processing in the receiver database. This processing is used for both uploading and loading data. Go to the “Download” tab and specify the path to the XML file into which the data was previously downloaded. After that, click on the “Download data” button.

The download result will be displayed in messages. In our case, everything went well.

The “Nomenclature” directory in the receiving database was not filled out. Now it has five elements: three nomenclature positions and two groups.


