How to number pages in Microsoft Word. How to number pages in Word How to number horizontal pages in Word
In voluminous and important text documents (for example, technical justification, graduation project, abstract), numbering is a must. Using page numbering makes it easier to find the information you need.
How to create numbering in Word 2003?
The venerable age of the text editor does not affect its popularity. Many users still use it today. Therefore, the instructions will begin with this version of the program. Follow the steps:If necessary, you can start counting from any number. To do this, click the “Format” button, enter the required character in the “start with” field and click OK.
How to make numbering without affecting the initial sheet?
Such a need arises when there is, for example, an abstract, content. These elements are not numbered. To avoid touching them, use the diagram below.
- Place the cursor at the end of the sheet (usually the first or second) that does not need numbering. Click "Insert" and click "Break" in the menu.
- A dialog box will appear where you can select “from next page” and click OK. The cursor will move to another sheet.
- Now repeat all the points of the previous diagram.
How to number a document in Word 2007?
In this version of the text editor, solving the problem is quite simple. The ribbon interface will make the process as easy as possible. Follow the steps:
The program allows you to change the type of inscription (Roman characters, letters, framed symbols, with dashes, etc.). This can be done in just a few clicks. Here's the diagram:
Repeat the first step of the instructions above. Only from the list will you need the “Page Number Format”. A window will appear in front of you, where you select the desired option and click OK.

Here you can start counting with an arbitrary number (for example, 6).
Creating numbering from n-list?
This is also easy to do. Use the following instructions:
- Open the docx file, place the cursor at the end of the sheet. In the “Page Layout” panel, click “Break” and select “Next Page” from the list. The cursor will move to another sheet.
- Click “Page Number” in the “Insert” tab, specify the desired design.
- Next, click “Close Header and Footer Window.”
- Now go back to “Page Number Format”, turn on the “start with” option and enter the number you want. Confirm the operation by clicking OK.
How to number a document in Word 2016?
Here the arrangement will not take much time, and the friendly tiled graphical shell will even show you what the numbering will look like. The procedure follows the instructions for Word 2007. But there are several differences:Follow the given step-by-step guides and the process of numbering in Word 2003, 2007, 2016 will become an easy task for you. Now there will definitely not be any difficulties with this issue.
Word 2003 is still a popular version, so let's start with that:
Microsoft 2007, 2010, 2013
More modern versions have appeared a long time ago. They set up the page count in the same way:

How to number sheets in a document
Sometimes, for example, when writing independent works, it is necessary not to take into account the title page, 2 or even 3 pages. This can also be done quite quickly using built-in functions.
Without title page
To cancel a number on the home page:

Interesting! This method will help to remove the number not only on the title page, but also on the first page of any section.

From page 2
If necessary, start numbering from the second page, do the following:

From page 3
It also happens that a document contains content in addition to the title page. Therefore, you have to set the numbering from page 3.
This can be done in the same way as in the above case:
- Create sections.
- Remove the “Same as in the previous section” function from the first two sheets.
- Enable numbering on the desired page.
- Select the “Start from 1” format.
Except some
The editor also allows you to disable numbering on certain sheets. Everything is done as standard:
- Activate the “Page Number” function.
- The file is divided into sections.
- Find the required page.
- Go to the designer and uncheck “Same as in the previous section.”
- We erase the number manually and close the constructor. On this and subsequent sheets the numbering will disappear.
- Select a sheet below. Repeat step 3. Then click on “Page Number”. Continue with the desired number using the “Start with...” format.
The result is the following:

How to set automatic numbering in the editor
Word has an interesting feature. The inserted numbering continues automatically. The numbers don't get confused even if you remove any sheet. This is quite convenient, since you don’t have to re-install them.
How to change the format
Word also allows you to change the appearance of numbers to Roman, Arabic and even letters. This can be done in a few steps:

Good to know! The “Number Format” window can also be opened by manually selecting the page number in the designer and right-clicking.

How to remove page numbers in Word
In order to remove numbers from all pages, you need to use a simple function. It is still located in the same context menu “Page numbers”. 
How to format content
In addition to numbered pages, one useful navigation method is a table of contents. To issue it you need:

In the process of writing an essay, diploma or book, we all use the text editor for Microsoft Word documents. Proper formatting should generally include page numbering within the document. Many people have difficulties and do not know how to number pages in Word, although it is quite simple to do.
This article describes in detail how to number pages in Word, choose the numbering location, format, and also exclude numbering of any document page.
Page numbering in Word 2007, 2010, 2013 and 2016
In all versions older than Word 2003, numbering is the same. The screenshots below are based on Word 2017, but they will also work for older versions.
To add numbering in an open document, go to the “Insert” tab. In the “Header and Footer” section, click “Page Number” and select a numbering position. In the screenshot below, I have chosen the footer location with centered placement.
After this action, numbering will appear at the end of each page, as well as displaying a header and footer. To close the display of headers and footers, click the “Close Header and Footers Window” button.
If desired, you can change the numbering format, for example, by making the numbers not Arabic, but Roman. To do this, again go to the “Insert” tab and in the “Page Numbers” item open “Page Number Format”.
Here you can choose the appearance, as well as which number the numbering will begin with. Why this may be required you will find out in the next paragraph.

Removing numbering from the title page
In most educational institutions, one of the requirements for document formatting is the absence of numbering on the title (first) page. If you simply enable page numbering, as shown above, then the numbering will be on the first sheet. To start numbering from the first page, but not display it on the title page, you must do the following.
Go to the “Layout” tab and click on the “Page Setup” link, as shown in the picture below.
Go to the “Paper Sources” tab and check the “Distinguish between first page headers and footers” checkbox. After that, click OK.

Now numbering is carried out as before, but its number is not displayed on the first page, in our case number 1.
When you want the numbering not to be displayed on the first page (title page), but on the second so that it starts with the number 1, you need to set the numbering from 0 in the menu “Insert” - “Page Number” - “Page Number Format”. the first page will start with number 0 without display, and the second page will start with number 1, the third page with number 2 and so on.
Numbering from the third page
Let's complicate the task a little. We need the numbering to be present, but not displayed on the first and second pages. After all, the first page is usually the title page, the second can be a table of contents, where numbering is also not required.
To number from the third page you will need to do an operation called “Page Break”. First, return all numbering settings to default if you have hidden the numbering display on the cover page. Let's assume that you currently have numbering enabled from the first page and the number 1 is displayed on the title page, the number 2 on the second page, and so on.
For convenience, turn on the display of all characters in Word. To do this, on the “Home” tab, click on the “Display all signs” button.
Now that you have all the characters in your documents displayed, including spaces and empty lines, left-click on the last character on the first page of the document. Then on the “Layout” tab, click “Breaks” - “Next Page”.
Do the same steps with the second page of the document. If you did everything correctly, then the enabled display of all characters function will show you break lines at the end of the first and second pages. In the picture below they are shown with red arrows.
Now the third page is numbered 1. If you want it to be numbered 3, then in the menu “Insert” - “Page Number” - “Page Number Format” set the value to “Start from 3”.
There is only one problem left, on the first two pages we have page numbers displayed. To remove them, select the first page, go to the “Layout” tab - “Page Options”. Next, in the “Paper Source” tab, check the box next to “Distinguish between first page headers and footers.”
Do the same on the next page of your document.
Thus, we were able to make sure that the numbering on the first two pages was not displayed and started from the third, and from the number we wanted.
By the way, this method with a break allows you to start numbering not only from the third page, but from absolutely any one.
To remove numbering, double-click on any page number and press the DEL key. All numbers will be removed from the document.
Page numbering in Word 2003
There are still quite a few people who use the outdated Word 2003. In it, page numbering is done in a slightly different order than for newer versions of the program.
In the open Word 2003 file, click on the top menu “Insert” - “Page Numbers”.

Set the position of the numbers (for example, at the bottom of the page) and alignment (for example, to the right). By unchecking the “Number on the first page” item, you can disable numbering on the title page of the document.

Click on the "Format" button. Specify the numbering format (for example, Roman numerals), and also specify which digit to start page numbering with.

After making changes, click OK and all pages will become numbered.

To number from the third or any other page in Word 2003, first turn on the display of all characters. After that, move the cursor to the last character on the first page and click “Insert” - “Page Break” in the horizontal menu. Do the same on the second one. From now on, numbering will start from the third page.
Most of the documents we create in Word can, and in most cases, consist of several pages or even several dozen pages. Such documents include abstracts, reports, projects, coursework, contracts, business plans, some reports, and other documents. According to generally accepted design standards, the pages of such documents must be numbered.
Some documents must be numbered from the first page to the last, while others, for example, are numbered starting from the second or third page or some other.
Today we will talk about the simplest and most commonly used page numbering, which we can use for most documents created. In the examples, I use my working sketches for one of the articles about Power Point.
The necessary options with which we number the pages of a document and format (edit), in general, change the numbering itself, are located in the “Insert” and “Page Layout” tabs of the top menu:
I would call the numbering options in the “Insert” tab “start”, since with the help of them we begin page numbering. Let's open the "Insert" tab and direct all our attention to its "Header and Footers" section, with the "Page Number" functionality located in it:
Let's click this main button “Page Number” to see the list of options:

The first three options (counting from top to bottom) contain numbering patterns, that is, options for the arrangement of numbers on the page. The option called “Current position” (4th in a row) also contains numbering templates, but working with these templates is somewhat different from working with the numbering of the first three options. Numbering using the third option is also unique and also differs from page numbering using the first two options.
But with the first two options “Top of the page” and “Bottom of the page” we can probably number pages most often. Let's talk about them first and foremost today.
Since page numbering using these options is almost identical and the only difference is the location on the page (at the top and bottom of the page) and the forms of the numbering itself, in the examples we use the “Top of the page” option.
Let's select it with a mouse click:

and a list of numbering format templates will open before our eyes:

The patterns that our eyes see are only part of all the numbering patterns. In order to see other templates and make a choice at our discretion, we need to move the slider on the right side of the window, or click the up/down arrow buttons:

When choosing a template, we need to take into account the nature of the document we are working on. The “playful” numbering format is not suitable for business documents.
As soon as we select one of the templates by clicking the mouse, all pages of the document are automatically numbered (I specifically chose a template with clearly visible numbering):

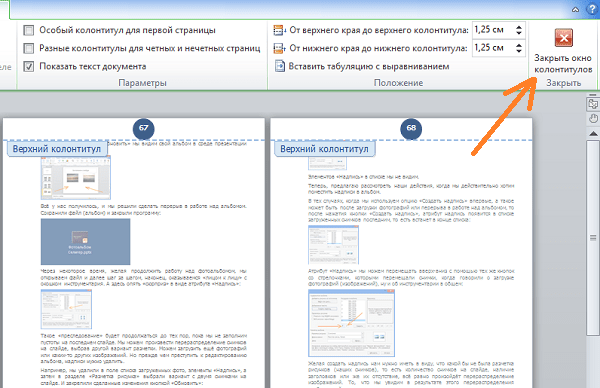
Since the main button “Page Number” is located in the “Header and Footer” section, page numbering occurs in the mode of working with headers and footers while simultaneously activating the new “Design” tab:

That's why we see all these dotted lines and inscriptions. After the pages are numbered, you need to exit the mode of working with headers and footers. To do this, click the button to close the window for working with headers and footers:

After clicking this button, all dotted lines disappear, but the page numbering we need remains:

We can apply numbering as soon as we start creating a document, as well as “in the midst of work” or when editing the text is completely finished and page numbering is the final action in working on the document.
Once applied to document pages, the numbering is retained. If we applied numbering at the very beginning, that is, at the moment when we just started working on the document, then we don’t need to worry about numbering the following pages. In this case, each new (next) page will be numbered automatically:

In the case when we work as a team on a project, we can only work with a certain part of the document. For example, we got the final part. The rest of the team members each numbered their part of the document, and the page numbering of our part of the document should begin with number 65.
In order for the page numbering to begin with the number 65, we need to use the “Page Numbering Format” option, selecting it in the already familiar list of page numbering options:

Let's select this option with a regular mouse click, and a window for setting its parameters will open in front of us. In this window we can change the format of the numbering itself:

and also set the initial page number from which page numbering should begin:

In our example, the numbering should begin with number 65. We need to write this number (select using the arrow buttons) in the “Start with...” input line. Let's do just that - write it:

Well, the final action is to click the “Ok” button.
So what do we see? We see the same picture. The pages of our document, as they were without numbering, remained just as blank.
But the thing is that we have completed only one part of the settings. Now we need to perform another part of the settings, that is, select the desired template from the list of numbering templates. In other words, determine the location of the numbering on the pages.
Let’s select the “Top of the page” option (it serves as an example for us) and a list of numbering patterns in which the number 65 appears will open before our eyes:

By clicking the mouse, select the desired template and the pages will be numbered:

And finally, let’s close the window for working with headers and footers:
and all the dotted lines will disappear:

We can first select a numbering template - let the pages be numbered, and only then enter the desired number of the first page in the “Page Number Format” box (we had number 65). The original numbering will automatically change, and the first page will begin with number 65 (the number from the example).
We already know how to number pages. And if we need to change the numbering format or it turns out that it is not needed in some document, then we will use the “Remove page numbers” option. We saw this option in the page numbering options window.
We all love Microsoft Word for its ease of use. Whatever they say, alternatives in the form of LibreOffice and the like are still far from ideal - students and schoolchildren prefer the brainchild of Bill Gates in their work. When the document is the simplest, then as a rule there are no problems with it. However, there are an incredibly large number of nuances in such a seemingly elementary task as numbering pages in Word.
What nuances might there be in numbering? — I want to touch on the topic of sections with you (a very convenient feature in MS Word) and talk about different numbering methods. For example, skipping the first page or Roman numerals, all this is actively used in any document that is a little more complicated than a school essay.
If you need to put page numbers in a document without any problems, then there is a simple solution for you (as they say in a couple of clicks). The instructions are suitable for any version of Office Word above 2007 (owners of 2003 Word... finally upgrade).
Move to the “Insert” tab and on the ribbon with buttons look for “Page Number” in the “Header and Footers” section (we'll talk about them later).

A pop-up menu will show us possible places and styles of numbering. At the top of the page or the classic one at the bottom - this is not all that Word can do, the last few layout options help to arrange page numbers more flexibly... but we need everything to be simple, so we will look at more advanced methods in another part of the note.

In each of the proposed options, you can see what the page numbers in our document will look like - just choose the style we like...

If you, like me, have chosen the top or bottom numbering location, the Header and Footer settings window will automatically open. Here you can adjust the numbering more precisely in the future, but for now just close the “Header and Footer Designer” (or just double-click in an empty area of the document).

This is the easiest way to number pages in Microsoft Word - nothing extra, just numbers without settings and in a couple of clicks. Suitable only for basic documents without a complex structure.
However, documents are not always simple and basic page number settings are not enough. For example, what to do if the number is on the first page (or the first page of a section) not needed? How to make different designs on even and odd pages (like in many books) or use roman numerals? — We will now consider all this in more detail.
How to put numbers without the first page in Word
Quite often in Word documents we use a cover page and it would be stupid to see the number “1” in the corner. As a rule, headers and footers are used for the title page, separate from the rest of the document. You can open the header and footer window through the tab menu as in the previous method, or by simply clicking on the top or bottom margin of the page.
On the Design tab, you will find the option to check the “Custom footer for the first page” checkbox.

It is important to realize here that this does not apply to a specific document... but to the currently active section. As a rule, few people know how to professionally layout documents in Word - so usually users have an entire document consisting of one section.
But you understand that this parameter is applied to the first page of each section - in fact, it is very convenient and logical
Different numbering on even and odd pages
Page numbers in Word can be different for even and odd... why did I compare this to books? — If you pick up the book, you will probably notice that on the left page the number will be on the left side of the sheet, on the second page, respectively, on the right. To implement this functionality, we use even and odd pages.
As usual, go to the “Design” tab (if you forgot how to get there, look a little higher - we already looked at it at the beginning of the post) and check the box “Different headers and footers for even and odd pages.”

Microsoft Word will automatically arrange the pages - all you have to do is set different headers and footers for even and odd pages (if the standard option does not suit you)
How to number pages in Word or sort out sections
The methods described above for assigning page numbers are not always enough. For example, when completing my thesis, I needed to paste in an estimate for construction and, accordingly, the numbering should have skipped this section with calculations (i.e., when printing the diploma, I had 1-75 and 89-112, for example, with 75-89 they were printed from another program).
In order not to produce empty sheets in the document (and many did) we can turn to sections of Microsoft Word for help - a very useful functionality that many do not use.
The first thing we need to do for non-standard numbering is to create different sections with their own rules. Select the end of the first section and go to the "Layout" tab, select "Breaks" and in the "Section Breaks" category select "Next Page" - from the next page you will start a new section of the document, but it will still copy the settings of the entire document... here we go further!

Now that we have two sections (or maybe more) we need to break the connection between the new part of the document and the old section. To do this, double-click on the top or bottom margin of the page to open the header and footer editor window and !TURN OFF“Same as previous section” option

Now each section of a document can have its own numbering - what page number options do we have?
Number format - Roman numerals
You don’t often see Roman numerals in numbering, but we are looking into the issue to the maximum—we won’t miss this opportunity. You should already have page numbers inserted in advance - we'll just change their format.
Right-click on the page number and select “Format Page Numbers...” from the context menu.

Numbering parameters are hidden here, which can be changed to Roman numerals (and also add section names and other features to the headers and footers)

As you can see, in Word you can use not only digital page numbering, but also alphabetic ones... however, this method has not become widespread in Russia and therefore I do not see an urgent need to talk about it.
Page numbering from an arbitrary number
As I already wrote above, there are situations in which it is necessary to skip part of the numbering or start not from the first sheet. If you need to start from the second or later sheet, then you do not need to create new sections. If you want to change the numbering in the middle of the document, then first create sections (the parameters apply specifically to partitions) and again click on the numbering and select “Format page numbers...”

In the "Page Number Format" window, in the "Page Numbering" category, select which page you want to start numbering from in the section (I started with 99 for example)

As you can see, there is nothing complicated in creating page numbers; you just need to figure out the sections and everything will go like clockwork!
What to do if the numbering in a Word document is broken (broken)
If the numbering in a Word document is incorrect or is in a chaotic order, then there is almost certainly a problem with the sections (we have now tried to get a little more perverted with different formatting and numbering options).
The problem with sections in Word is their invisibility. In typical document markup, breaks and sections are not displayed in any way. From here follows a simple truth - show the sections and you will understand what is wrong with the numbering.
The easiest way to show document sections is to switch to draft mode (On the “View” tab, select the “Draft” document display option)

In “Draft” mode, Microsoft Word shows where exactly the sections break in the text.

Having determined the location of the sections, we return to the usual view of the document for working with Headers and Footers (for convenience of course) and begin the detective work.
Check that the headers and footers crooked section, I copy the parameters of the previous one... but in general, it’s better to read this note, then most likely there will be no problems understanding the numbering of an incomprehensible document
Results
Numbering pages in Word is not difficult, the problem lies in the nuances of numbering! I hope my note was useful to you and now you will use the sections and your “GURU ABSTRACTS” skill has improved a little. If you have any questions, I’m always happy to answer them in the comments!


